
The Complete Guide to Rain Gutter Installation: DIY Steps, Pitch Calculations, and Best Practices

Uncontrolled rainwater runoff from a home’s roofline causes severe structural issues over time, including foundation cracking, basement flooding, fascia rot, and landscape erosion. Installing a properly pitched, securely mounted rain gutter system collects this runoff and directs it safely away from the structure.
Whether using sectional aluminum or vinyl systems, achieving professional-grade results requires precise mathematical slope planning, correct flashing integration, and secure anchoring into structural framing.
1. System Planning: Sizing, Materials, and Hardware Selection
Before purchasing materials, calculate the roof’s drainage surface area and select the appropriate channel capacity for local weather conditions across the United States.
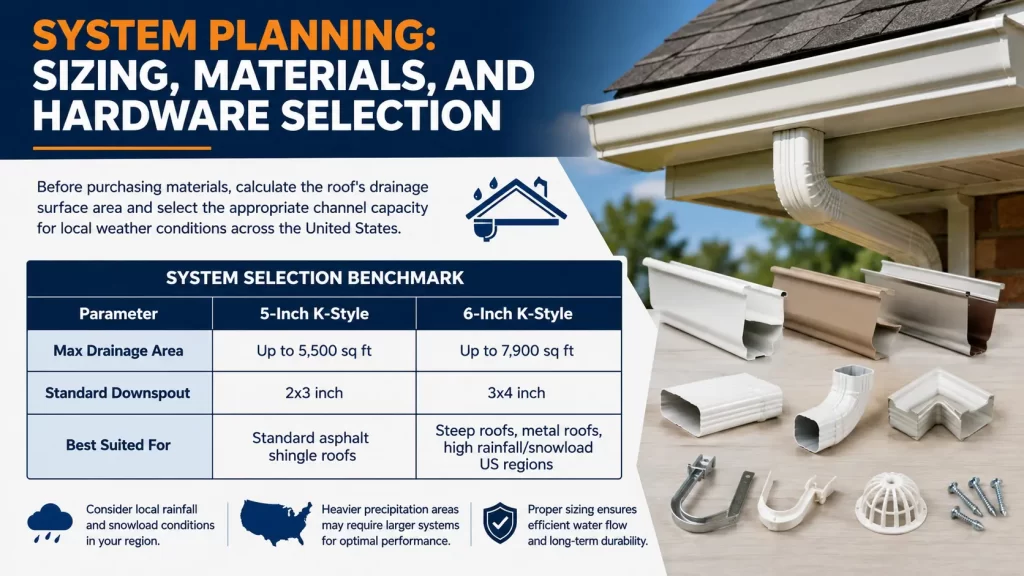
Material Comparison
- Seamless Aluminum (.027″–.032″ gauge): The industry standard for long-term residential performance. Highly resistant to rust and lightweight. While professional installations utilize custom continuous roll-forming machines on site, homeowners can utilize 10-foot or 20-foot sectional aluminum channels connected with specialized slip-joint connectors and heavy-duty sealant.
- Vinyl (PVC): A lightweight, budget-friendly option popular for DIY gutters due to snap-together joints with rubber gaskets. Ideal for dry to moderate climates, though vulnerable to brittleness in severe sub-zero temperatures.
- Copper: Premium material with a 50+ year lifespan that develops a distinctive green patina over time. Requires soldered joints and specialized copper hardware to prevent galvanic corrosion.
2. Step-by-Step Gutter Installation Procedure
Executing a clean installation requires sequential measurement, ground assembly, and proper ladder safety protocols.
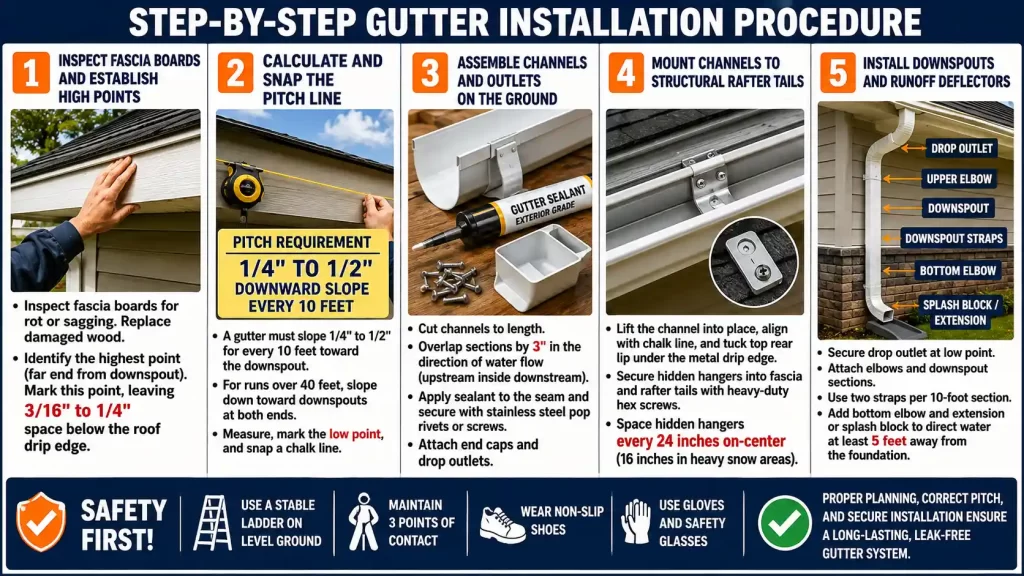
- Inspect Fascia Boards and Establish High Points
Inspect the exterior fascia board along the roofline for signs of wood rot, soft spots, or structural sagging. Replace damaged lumber before proceeding. Identify the highest point of the gutter run typically at the end farthest from the designated downspout outlet. Mark this point on the fascia, leaving a 3/16-inch to 1/4-inch space directly below the roof drip edge flashing. - Calculate and Snap the Pitch Line
A functioning rain gutter system requires a downward slope of 1/4 inch to 1/2 inch for every 10 horizontal feet of run toward the downspout. For runs longer than 40 feet, locate the highest point in the center of the wall and slope downward toward downspouts at both ends. Measure from your high-point mark to the low point, mark the low position, and snap a chalk line across the fascia board. - Assemble Channels and Outlets on the Ground
Cutting and joining sections on the ground is faster and more accurate than working atop a ladder. Measure the total run and cut channels using a fine-tooth metal blade or 32-TPI hacksaw. Overlap adjoining sections by 3 inches in the direction of water flow (upstream section fitting inside the downstream section). Apply a generous bead of high-grade exterior gutter sealant along the lap seam, then secure with stainless steel pop rivets or self-tapping sheet metal screws. Attach end caps and drop outlets to the assembly. - Mount the Channels to Structural Rafter Tails
Lift the assembled channel into place, aligning its top edge with the snapped chalk line. Tuck the top rear lip of the gutter underneath the metal drip edge flashing. Secure hidden hangers with integrated heavy-duty hex screws into the fascia board, driving fasteners through into the underlying rafter tails. Space hidden hangers every 24 inches on-center for standard loads, or every 16 inches on-center in regions subject to heavy snow and ice accumulation. - Install Downspouts and Runoff Deflectors
Secure the drop outlet at the low point of the run using a hole saw or tin snips. Attach an upper elbow to the outlet and bridge the overhang distance to the exterior wall using a short length of downspout tube and a lower elbow. Fasten downspout channels vertically against the siding using two downspout straps per 10-foot section. Attach a bottom discharge elbow at the base and fit it with an extension or splash block to divert discharge at least 5 feet away from the foundation wall.
3. Critical Installation Best Practices
- Tuck Beneath Drip Edge: Water running off roof shingles must flow directly into the gutter channel. Leaving the gutter back lip outside or below the drip edge allows water to run down the face of the fascia board, rotting wood and causing soffit damage.
- Allow for Thermal Expansion: Vinyl and aluminum expand and contract with seasonal temperature swings. Do not over-tighten hidden hangers or lock long single spans tight against fixed corner masonry.
- Seal Interior Seams: Never rely on exterior-only caulking. Apply specialized sealant inside the gutter channel across all joint laps, drop outlets, and end cap seams so water pressure reinforces the seal during heavy downpours.
4. Frequently Asked Questions
Should a gutter go under the drip edge?
Yes. The back edge of the gutter channel must sit underneath the roof drip edge flashing. This ensures that water rolling off the edge of the shingles drops straight into the gutter trough rather than dripping behind it onto the fascia board and underlying house framing.
Can I install guttering myself?
Yes, DIY installation is straightforward using pre-cut 10-foot sectional vinyl or aluminum components available at major home improvement stores. However, two-story homes, complex hip-and-valley roof designs, or continuous seamless aluminum systems require specialized roll-forming equipment and professional installation teams.
What is the proper way to install gutters?
The proper method involves thoroughly inspecting the fascia, setting a pitch of 1/2 inch of drop per 10 feet toward the downspout, sliding the rear flange of the gutter under the drip edge flashing, anchoring hidden hangers into structural rafter tails every 24 inches, and routing all downspout water discharge at least 5 feet clear of the foundation.
Do I need a permit to install rain gutters?
In most US municipalities, straightforward gutter repair, replacement, or retrofit work does not require a building permit. However, if your installation connects directly to municipal storm sewer lines, involves major exterior structural modifications, or sits within a designated Historic Preservation Overlay Zone, check with your local building department before starting work.
Is it normal for gutters to drip in heavy rain?
Minor splash-over can happen during extreme, record-breaking downpours when rainfall rate temporarily exceeds channel or downspout volume capacity. However, persistent dripping along the fascia line or beneath seams usually indicates a setup issue: missing drip edge integration, clogged downspouts, sagging channels, or deteriorated joint sealant.